
 Do you want to know how to glue and frame jigsaw puzzles? Finishing a jigsaw puzzle is a satisfying achievement.
All those hours of focus and patience come together into one beautiful image.
Instead of breaking it apart and returning it to the box, why not preserve your masterpiece as art?
Learning how to glue and frame your completed jigsaw puzzles is easier than you might think.
It allows you to turn your favorite puzzles into lasting wall décor or thoughtful gifts.
In this guide, we’ll walk you through everything you need to know, from choosing the right glue to framing techniques that protect and showcase your puzzle perfectly.
Table of Contents
1. Prepare Your Puzzle Surface
Before applying any glue, ensure your puzzle is completely flat and free of dust or lint.
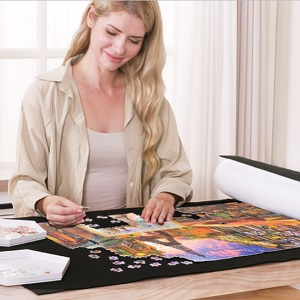
Work on a smooth surface like a puzzle mat or foam board. If you used a puzzle mat, carefully slide sturdy cardboard underneath the puzzle so you can move it without breaking the pieces.
Pro Tip: Lightly press down on the puzzle with a rolling pin to secure loose pieces before gluing.

The puzzle mat is made of smooth polyester top surface and natural rubber bottom, say goodbye to frustrating creases, solve countless puzzles on the puzzle mat and make the process of puzzling easy and comfortable
2. Choose the Right Puzzle Glue
There are several types of puzzle glue available, and each offers a slightly different finish:
– All-in-one glues: Combine adhesive and sealant; they’re easy to apply and dry clear.
– Spray adhesives: Great for even coverage but require ventilation and protective surfaces.
– Brush-on puzzle glue: Offers more control and works well for large puzzles.
Popular brands like Mod Podge Puzzle Saver and Ravensburger Puzzle Conserver are highly recommended.
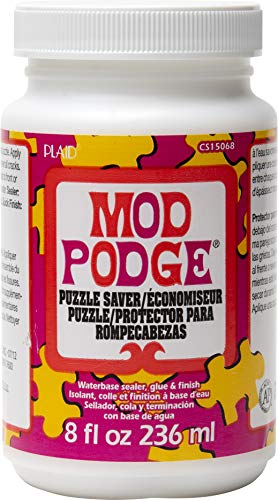
Mod Podge Puzzle Saver is a quick-drying, clear finish that leaves a smooth, glossy finish. Preserve the beauty of your puzzle projects and more with this multi-purpose decoupage glue. This all-in-one sealant, glue, and finish is a great way to ensure your hard work stays together to display it.
3. Apply the Glue Evenly
Use a foam brush or applicator to spread the glue evenly across the puzzle’s surface. Don’t pour it directly from the bottle; a thin, controlled layer works best.
Make sure to cover all the pieces and edges. The glue will look white at first, but will dry clear within a few hours. For a smoother finish, apply a second coat once the first is completely dry.
Optional: Flip the puzzle and apply glue to the back for extra reinforcement (especially for large puzzles).
4. Mount and Frame Your Puzzle
Once your puzzle is fully dry, you can mount it for framing. Use foam board or puzzle backing paper to keep it sturdy. Trim any excess edges if needed.
For framing:
– Choose a frame slightly larger than your puzzle.
– Use a non-glare acrylic sheet to protect against dust and sunlight.
– Avoid heavy glass frames for large puzzles, as they can cause bending over time.

This black woodgrain puzzle saver frame is designed to preserve and display finished puzzles. This puzzle frame features a sleek profile and fits a 14.25x19.25 finished puzzle or a smaller puzzle with a mat for a perfect display.
5. Display Your Puzzle Artwork
Now that your puzzle is preserved and framed, it’s ready to display! Hang it in a playroom, hallway, or office to remind you of the patience, creativity, and teamwork it took to complete.
You can even create a puzzle gallery wall with your favorite designs, landscapes, animals, or vintage artwork, which makes for especially striking displays.
Celebrate Your Accomplishment!
Gluing and framing your jigsaw puzzle is a rewarding way to celebrate your accomplishment and add a personal touch to your home décor.
With the right materials, a bit of patience, and care, your puzzle can live on as a unique piece of art instead of being tucked away in a box.

Simply peel the backing from the adhesive sheets and stick them to the back of your finished puzzle. That’s it. Your masterpiece is saved! No mess and takes only minutes.


