
 Do you want to know how to frame finished puzzles? You’ve spent hours, maybe days, completing that beautiful jigsaw puzzle.
Every piece placed perfectly, the image is finally whole. But instead of taking it apart, why not preserve your finished puzzle as a work of art?
Framing your puzzle is a fun, rewarding way to celebrate your accomplishment and add a unique personal touch to your home décor.
In this guide, we’ll walk through the simple steps to frame and protect your finished puzzle so you can enjoy it for years to come.
Table of Contents
Step 1: Prepare the Puzzle Surface
Before framing, make sure your puzzle is completely flat and clean.
Check for gaps or raised pieces. Gently press everything into place.
Remove dust or debris. Use a soft brush or a clean, dry cloth to wipe the surface.
Work on a firm surface. Sliding cardboard or wax paper underneath helps for easy movement later.
Pro tip: Take a photo of your puzzle before applying adhesive, just in case!
Step 2: Apply Puzzle Glue
Puzzle glue is key to preserving your masterpiece. It seals the surface and holds the pieces together.
1. Place wax paper under your puzzle to prevent sticking.
2. Use a puzzle-specific glue (like Mod Podge Puzzle Saver).
3. Pour a small amount and spread evenly with a foam brush.
4. Let it dry for 2–3 hours, then apply a second coat if desired.
Once dry, gently lift your puzzle to ensure it’s secure and fully bonded.
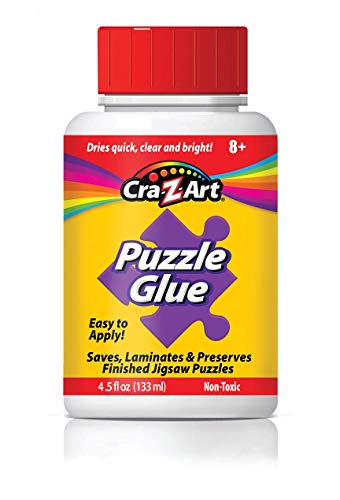
This puzzle glue is perfect for the serious puzzler! This glue is easily applied with our resuable applicator included.

Just turn your completed puzzle over. Apply the adhesive sheets to the back of the puzzle. The set contains 6 adhesive sheets and 2 sticky mounts for hanging your puzzle on the wall.
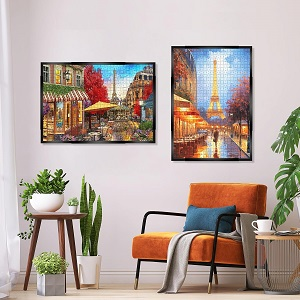
Step 3: Choose the Right Frame
You can frame your puzzle just like a photo or painting. The key is getting the right size and fit.
Measure your puzzle. Most boxes list the completed dimensions.
Pick a frame with backing. Poster frames work great for standard sizes.
Choose a mat board. Adds visual polish and prevents edge damage.
Decide on glass vs. acrylic. Acrylic is lightweight and shatter-resistant, while glass gives a clearer finish.

This puzzle frame kit helps you transform your completed puzzle into a beautiful piece of wall art. Complement any decor style with a sleek and minimalist puzzle display in a matte black frame.
Step 4: Mount and Secure the Puzzle
How to frame finished puzzles: Use double-sided mounting tape, spray adhesive, or puzzle mounting boards to attach your puzzle inside the frame.
Center it carefully to avoid shifting. If the frame has clips, tighten them evenly so the puzzle stays flat.
Optional: Add a mat border for an elegant gallery-style look.
Step 5: Display and Protect
Now it’s time to hang your art!
– Avoid direct sunlight. UV light can fade colors over time.
– Keep away from humidity. Moisture can warp puzzles or frames.
– Dust regularly. Use a microfiber cloth to keep the glass clean.
Your finished puzzle is now a beautiful, lasting keepsake , a conversation piece that reflects patience, creativity, and pride.
Make Your Puzzle a Work of Art
Framing a jigsaw puzzle turns a temporary hobby into a lasting treasure. With just a little glue, care, and creativity, you can preserve your favorite puzzles as meaningful wall art.
Whether it’s a Ravensburger landscape, a Thomas Kinkade cottage, or a family project, framing your puzzle lets you celebrate every piece of the journey.
Ready to get started? Explore our top picks for puzzle glue, frames, and display kits to turn your favorite puzzles into timeless masterpieces.

This 300 Piece Jigsaw puzzle makes for an ideal and thoughtful gift for puzzle enthusiasts and beginners alike.


